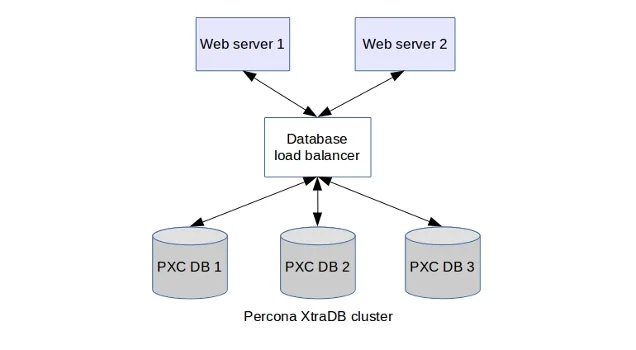
In today’s dynamic IT environments, high availability, scalability, and data integrity are paramount concerns for database administrators. Percona XtraDB Cluster (PXC) offers a robust solution to address these needs. Combined with HAProxy for load balancing and Percona Monitoring and Management (PMM) for monitoring and troubleshooting, you can build a reliable and efficient database infrastructure. Let’s walk through the setup process step by step.
Let’s explore the following topics:
- Introduction:
- Introduce the topic of setting up Percona MySQL Cluster with HAProxy Load Balancer and Monitoring.
- Briefly mention the importance of high availability, scalability, and data integrity in database environments.
- Installation and Configuration of Percona XtraDB Cluster:
- After explaining the installation steps, include a section describing the configuration of Percona XtraDB Cluster nodes. You can insert the description of the SST user here, right after setting up the SST user.
- Setting Up SST User:
- Place the description of the SST user after the configuration steps for Percona XtraDB Cluster nodes.
- Describe the purpose, authentication, privileges, security, and usage of the SST user.
- Emphasize its importance in facilitating the State Snapshot Transfer process in Galera-based clusters.
- HAProxy Load Balancer Installation and Configuration:
- Following the Percona XtraDB Cluster setup, include the section on installing and configuring HAProxy.
- Insert the HAProxy configuration details, including global settings and proxy configurations.
- Explain the purpose of each configuration directive and how it contributes to load balancing and fault tolerance.
- Percona XtraBackup Plan:
- After explaining HAProxy configuration, introduce the backup system configuration section.
- Include the details of scheduling backups, retention policy, monitoring backup jobs, testing restores, encryption, compression, and backup verification.
- Provide example cron jobs, scripts, and commands for each aspect of the backup system.
- Percona Monitoring and Troubleshooting:
- Conclude the main setup steps with the installation and configuration of Percona Monitoring Server and client.
- Include the description of configuring the database for monitoring and creating a monitoring user.
- Briefly mention the importance of monitoring and troubleshooting in maintaining a healthy database cluster.
- Scenario-Based Troubleshooting:
- After explaining the setup steps, present the scenario-based troubleshooting section.
- Include the various real scenarios that commonly occur in Percona XtraDB Cluster deployments.
- Describe the troubleshooting steps for each scenario, providing guidance on identifying and resolving issues.
- Advantages of Percona MySQL Cluster Setup:
- Conclude the blog post with a section highlighting the advantages of the Percona MySQL Cluster setup.
- Summarize the benefits of high availability, scalability, data integrity, automatic node provisioning, HAProxy load balancing, and Percona Monitoring and Troubleshooting.
Introduction
Percona XtraDB Cluster (PXC) is a powerful database clustering solution designed for MySQL. Let’s dive into how it works:
- High Availability:
- PXC ensures high availability by creating a multi-master setup. Each node in the cluster can accept both read and write requests.
- If one node fails, the remaining nodes continue to serve requests, minimizing downtime.
- Galera replication technology synchronizes data across nodes, making them appear virtually synchronous1.
- Data Consistency:
- When a write operation occurs on one node, it’s immediately replicated to all other nodes.
- This synchronous replication ensures data consistency across the cluster.
- Linear Scalability:
- As your workload grows, PXC allows you to scale horizontally by adding more nodes.
- New nodes can handle additional read and write requests, distributing the load.
- Installation Options:
- You can install PXC using various methods:
- Percona Repositories: Use APT or YUM to install from Percona repositories.
- Binary Tarballs: Download and install directly from binary tarballs.
- Docker: Deploy PXC using Docker containers.
- Percona Server for MySQL: PXC is based on Percona Server for MySQL, which provides enhanced performance and features1.
- You can install PXC using various methods:
- Backup and Restore:
- Percona XtraBackup (PXB) is an open-source backup solution for PXC.
- It performs online non-blocking, compressed backups on transactional systems.
- Use PXB to maintain fully available applications during planned maintenance windows1.
- Monitoring and Management:
- Percona Monitoring and Management (PMM) captures performance data for MySQL variants, including PXC.
Installation and Configuration of Percona XtraDB Cluster 5.7
Preparing the Environment
First, ensure you have a DEB-based distribution such as Debian or Ubuntu Linux.
| sudo apt update sudo apt install curl |
Installing Percona XtraDB Cluster
Download and install the Percona release package:
| curl -O https://repo.percona.com/apt/percona-release_latest.generic_all.deb sudo apt install gnupg2 lsb-release ./percona-release_latest.generic_all.deb sudo apt update sudo apt install percona-xtradb-cluster-57 |
Configuring Percona XtraDB Cluster Nodes
Edit /etc/mysql/percona-xtradb-cluster.conf.d/wsrep.cnf on each node with respective configurations.
Node-1
| # MySQL configuration for Percona XtraDB Cluster [mysqld] wsrep_provider=/usr/lib/libgalera_smm.so # Path to Galera library wsrep_cluster_name=perconaRnD-DBCluster # Name of the Galera cluster wsrep_cluster_address=gcomm://172.17.1.101,172.17.1.102,172.17.1.103 # Cluster addresses wsrep_node_name=perconaRnD-DB1 # Name of this node wsrep_node_address=172.17.1.101 # IP address of this node wsrep_sst_method=xtrabackup-v2 # State snapshot transfer method wsrep_sst_auth=sstuser:passw0rd # Authentication credentials for SST #pxc_strict_mode=ENFORCING # PXC strict mode (optional) binlog_format=ROW # Binary logging format default_storage_engine=InnoDB # Default storage engine innodb_autoinc_lock_mode=2 # Auto-increment lock mode pxc_strict_mode=”DISABLED” # Disable strict mode sql_mode=”” # SQL mode skip-name-resolve # Skip DNS resolution skip_external_locking # Skip external locking |
This MySQL configuration is for a Percona XtraDB Cluster node named “perconaRnD-DB1” with the IP address “172.17.1.101”. It’s part of a cluster named “perconaRnD-DBCluster” with cluster addresses specified as “172.17.1.101”, “172.17.1.102”, and “172.17.1.103”. The state snapshot transfer method is set to “xtrabackup-v2” with authentication credentials provided for SST. Various MySQL settings such as binlog format, storage engine, auto-increment lock mode, strict mode, SQL mode, and others are also configured.
Node-2
| [mysqld] wsrep_provider=/usr/lib/libgalera_smm.so wsrep_cluster_name=perconaRnD-DBCluster wsrep_cluster_address=gcomm://172.17.1.101,172.17.1.102,172.17.1.103 wsrep_node_name=perconaRnD-DB2 wsrep_node_address=172.17.1.102wsrep_sst_method=xtrabackup-v2 wsrep_sst_auth=sstuser:passw0rd #pxc_strict_mode=ENFORCING binlog_format=ROW default_storage_engine=InnoDB innodb_autoinc_lock_mode=2 pxc_strict_mode=”DISABLED” sql_mode=”” skip-name-resolve skip_external_locking |
Node-3
| [mysqld] wsrep_provider=/usr/lib/libgalera_smm.so wsrep_cluster_name=perconaRnD-DBCluster wsrep_cluster_address=gcomm://172.17.1.101,172.17.1.102,172.17.1.103 wsrep_node_name=perconaRnD-DB3 wsrep_node_address=172.17.1.103 wsrep_sst_method=xtrabackup-v2 wsrep_sst_auth=sstuser:passw0rd #pxc_strict_mode=ENFORCING binlog_format=ROW default_storage_engine=InnoDB innodb_autoinc_lock_mode=2 pxc_strict_mode=”DISABLED” sql_mode=”” skip-name-resolve skip_external_locking |
Bootstrapping the Cluster
Bootstrap the first node:
| sudo /etc/init.d/mysql bootstrap-pxc |
Setting Up SST User
Create an SST user and grant the necessary privileges:
| sudo mysql -u root -p mysql> CREATE USER ‘sstuser’@’localhost’ IDENTIFIED BY ‘passw0rd’; mysql> GRANT RELOAD, LOCK TABLES, PROCESS, REPLICATION CLIENT ON *.* TO ‘sstuser’@’localhost’; mysql> FLUSH PRIVILEGES; |
The SST (State Snapshot Transfer) user is a MySQL user account specifically used for the State Snapshot Transfer process in Galera-based database clusters like Percona XtraDB Cluster (PXC).
Description of SST User:
- Purpose:
- The SST user is created to facilitate the transfer of database state from one cluster node to another during cluster initialization or when a new node joins the cluster.
- Authentication:
- The SST user’s credentials are used by the joining node to authenticate and obtain a snapshot of the database state from an existing node in the cluster.
- Privileges:
- The SST user requires certain privileges to perform the SST process effectively. These privileges typically include RELOAD, LOCK TABLES, PROCESS, and REPLICATION CLIENT.
- Security:
- It’s essential to secure the SST user’s credentials since they provide access to sensitive database data. Use strong passwords and limit access to the SST user account to trusted entities within the cluster.
- Usage:
- The SST user’s credentials are specified in the MySQL configuration of each node in the cluster to enable automatic state transfer when needed.
Understanding the SST user and its role in the cluster setup is crucial for the following reasons:
- Security: Describing the SST user emphasizes the importance of securing its credentials to prevent unauthorized access to the database.
- Cluster Initialization: Knowing about the SST user helps ensure a smooth cluster initialization process by configuring the user correctly.
- Troubleshooting: In case of issues during the SST process, understanding the role of the SST user can aid in troubleshooting and resolving problems effectively.
- Best Practices: By describing the SST user, best practices for managing MySQL users in a clustered environment can be reinforced, contributing to the overall security and stability of the database cluster.
Starting Cluster Nodes
Start Node-2 and Node-3:
| sudo /etc/init.d/mysql start |
Verifying Replication
Test replication by inserting data into Node-1 and checking on Node-2 and Node-3.
This replication will be performed following the Galera Replication method, Let’s delve into the intricacies of Galera replication, a cornerstone of the Percona XtraDB Cluster. Galera Cluster, a synchronous certification-based replication solution, is designed for MySQL, MariaDB, and Percona XtraDB environments. In this setup, each node in the cluster mirrors the others, ensuring they maintain an identical state. This uniformity enables seamless and transparent client interaction, effectively presenting the cluster as a unified, distributed database server.
Replications Steps:
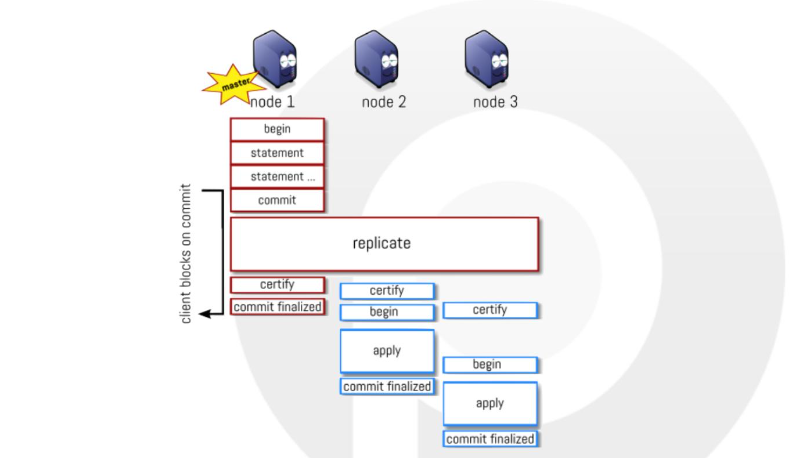
- As Master/Donor
- – Apply
- – Replicate
- – Certify
- – Commit
- As Slave/Joiner
- – Replicate (Receive)
- – Certify (Includes Reply to master/donor)
- – Apply
- – Commit
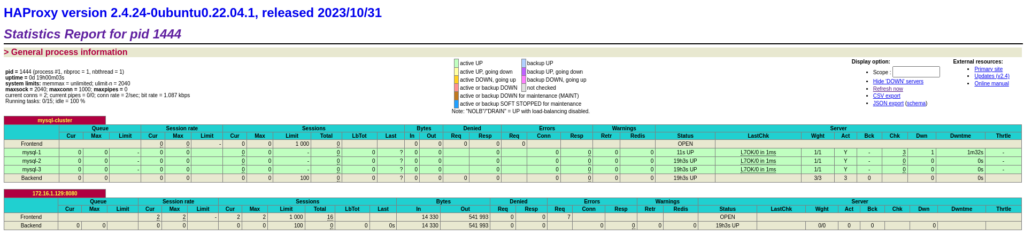
HAProxy Load Balancer Installation and Configuration
Installing HAProxy
| sudo apt update sudo apt install haproxy |
Configuring HAProxy
Edit /etc/haproxy/haproxy.cfg with the following configuration:
| # Global settings for HAProxy global log 127.0.0.1 local2 # Log messages to local syslog chroot /var/lib/haproxy # Change to chroot jail directory pidfile /var/run/haproxy.pid # PID file location maxconn 1000 # Maximum number of connections user haproxy # User to run haproxy process group haproxy # Group to run haproxy process daemon # Run haproxy in the background # Default settings for all proxy sections defaults log global # Log messages globally maxconn 1000 # Maximum number of connections retries 3 # Number of retries on a server failure timeout connect 5000ms # Timeout for connecting to a server timeout client 50000ms # Timeout for client connections timeout server 50000ms # Timeout for server connections # Proxy configuration for MySQL cluster listen mysql-cluster bind 172.17.1.104:3306 # Listen on IP address and port mode tcp # Set TCP mode option mysql-check # Enable MySQL health checks balance leastconn # Use least connection load balancing algorithm server mysql-1 172.17.1.101:3306 check # Backend server 1 with health check server mysql-2 172.17.1.102:3306 check # Backend server 2 with health check server mysql-3 172.17.1.103:3306 check # Backend server 3 with health check # Statistics monitoring configuration listen stats bind 172.17.1.104:8080 # Listen on IP address and port mode http # Set HTTP mode stats enable # Enable statistics stats uri / # URI for statistics page stats realm Strictly\ Private # Realm for authentication stats auth admin:password # Username and password for accessing statistics |
Restarting HAProxy Service
| sudo systemctl restart haproxy.service |
Let’s check
Percona XtraBackup Plan
Installing Percona XtraBackup
Check and install Percona XtraBackup:
| xtrabackup –version apt-get install percona-xtrabackup-24 |
To configure the backup system for your Percona MySQL cluster, you’ll need to perform several tasks. Below is an example of how you can configure the backup system, including scheduling backups, setting retention policies, monitoring backup jobs, testing restores, and implementing encryption and compression:
1. Schedule Backups:
Example Cron Job for Full Backup (Daily at Midnight):
| 0 0 * * * /usr/bin/xtrabackup –backup –user=bkuser –password=password –target-dir=/backup/full-$(date +\%Y\%m\%d) |
Example Cron Job for Incremental Backup (Hourly):
| 0 * * * * /usr/bin/xtrabackup –backup –user=bkuser –password=password –target-dir=/backup/inc-$(date +\%Y\%m\%d-\%H) –incremental-basedir=/backup/full-$(date +\%Y\%m\%d) |
2. Retention Policy:
Example Script for Rotating Backups (Retain Full Backups for 7 Days, Incremental for 1 Day):
| #!/bin/bash # Delete full backups older than 7 days find /backup -type d -name “full-*” -mtime +7 -exec rm -rf {} \; # Delete incremental backups older than 1 day find /backup -type d -name “inc-*” -mtime +1 -exec rm -rf {} \; |
Run this script periodically (e.g., daily) using a cron job.
3. Monitor Backup Jobs:
Configure monitoring and alerting tools to track the status of backup jobs. You can use tools like Nagios, Zabbix, or Prometheus with Grafana for monitoring. Set up alerts to notify administrators of backup failures or issues.
4. Test Restores:
Regularly perform test restores from backups to ensure data integrity and the effectiveness of the backup process. Create a separate testing environment where you can restore backups without impacting the production environment. Test restores should include both full and incremental backups to validate the entire backup and recovery process.
5. Encryption and Compression:
Example Configuration for Encryption and Compression in XtraBackup:
| xtrabackup –backup –user=bkuser –password=password –target-dir=/backup/full-$(date +\%Y\%m\%d) –encrypt=AES256 –encrypt-key-file=/path/to/encryption_key –compress –compress-threads=4 |
Explanation:
- –encrypt=AES256: Enable encryption with the AES256 algorithm.
- –encrypt-key-file=/path/to/encryption_key: Specify the path to the encryption key file.
- –compress: Enable compression to reduce backup size.
- –compress-threads=4: Use 4 threads for compression to improve performance.
6. Backup Verification:
Implement mechanisms to verify the integrity of backups, such as checksum validation:
Example Command to Verify Backup Integrity:
| xtrabackup –verify –user=bkuser –password=password –target-dir=/backup/full-$(date +\%Y\%m\%d) |
Run this command periodically as part of your backup verification process.
By implementing these configurations, you can ensure the reliability, security, and efficiency of your Percona MySQL cluster backups. Adjust the settings according to your specific requirements and environment.
Percona Monitoring and Troubleshooting
Installing Percona Monitoring Server
Pull and run Percona Monitoring Server Docker image:
| docker pull percona/pmm-server:2 docker volume create pmm-data export DATA_DIR=$HOME/srv docker run -v $DATA_DIR/srv:/srv -d –restart always –publish 80:80 –publish 443:443 –name pmm-server percona/pmm-server:2 |
Configuring Percona Monitoring Client
Install and configure the PMM client on each cluster node:
| sudo apt-get install pmm2-client sudo pmm-admin config –server-insecure-tls –server-url=https://admin:password@<PMM_SERVER_IP> |
Configuring Database for Monitoring
Create a user for monitoring and grant necessary privileges:
| sudo mysql -u root -p mysql> CREATE USER ‘pmm’@’localhost’ IDENTIFIED BY ‘StrongDBPassw0rd’ WITH MAX_USER_CONNECTIONS 10; mysql> GRANT SELECT, PROCESS, SUPER, REPLICATION CLIENT, RELOAD ON *.* TO ‘pmm’@’localhost’; |
Scenario Based Troubleshooting….
Here are several real scenarios that commonly occur in Percona XtraDB Cluster (PXC) deployments along with troubleshooting steps:
- 1. Cluster Node Failure:
- Scenario: One of the nodes in the cluster becomes unresponsive or crashes.
- Troubleshooting Steps:
- Check the node’s status using SHOW GLOBAL STATUS LIKE ‘wsrep_%’; to see if it’s in a non-operational state.
- Review MySQL error logs (/var/log/mysql/error.log) for any relevant error messages.
- Use tools like systemctl status mysql or service mysql status to check the MySQL service status.
- If the node is completely down, investigate server hardware, network, or other infrastructure issues.
- Once the issue is resolved, restart the MySQL service using systemctl restart mysql or equivalent.
- 2. Network Partition:
- Scenario: A network partition occurs, isolating one or more nodes from the rest of the cluster.
- Troubleshooting Steps:
- Check cluster status using SHOW STATUS LIKE ‘wsrep%’; on each node to identify if any nodes are unreachable.
- Look for network-related errors in MySQL error logs.
- Use tools like ping or netcat to test connectivity between nodes.
- If possible, resolve the network partition by fixing network configuration or infrastructure issues.
- Consider adjusting the pc.heartbeat_timeout and pc.ignore_sb parameters to handle network partitions more gracefully.
- 3. Quorum Loss:
- Scenario: The cluster loses quorum due to a network partition or multiple node failures.
- Troubleshooting Steps:
- Check the cluster status using SHOW STATUS LIKE ‘wsrep%’; on each node to confirm quorum loss.
- Review MySQL error logs for any quorum-related messages.
- Analyze the cluster topology and determine if enough nodes are available to maintain quorum.
- If necessary, manually bootstrap the cluster using bootstrap-pxc command on the node with the most up-to-date data.
- Ensure that the bootstrap node has the most recent data and join the other nodes back to the cluster.
- 4. Data Inconsistency:
- Scenario: Data on one node differs from the rest of the cluster, leading to inconsistency.
- Troubleshooting Steps:
- Compare data between nodes using SQL queries or tools like Percona Toolkit’s pt-table-checksum.
- Review MySQL error logs for any replication errors or SST failures.
- Check for disk space issues or disk errors that may have caused data corruption.
- Use Percona XtraBackup to take a backup of the inconsistent node and restore it from a consistent node.
- If the inconsistency persists, investigate application-level issues or data modification queries that may have caused the inconsistency.
- 5. Performance Degradation:
- Scenario: Cluster performance degrades, leading to slow response times or high latency.
- Troubleshooting Steps:
- Monitor cluster performance metrics using tools like Percona Monitoring and Management (PMM) or Prometheus/Grafana.
- Identify any spikes or abnormalities in CPU, memory, disk I/O, or network usage.
- Review slow query logs (slow_query_log) to identify any queries causing performance issues.
- Optimize slow queries by adding appropriate indexes, rewriting queries, or optimizing database schema.
- Consider scaling up or adding additional nodes to distribute the workload more evenly.
- 6. Disk Space Exhaustion:
- Scenario: One or more nodes run out of disk space, impacting database operations.
- Troubleshooting Steps:
- Check disk usage on each node using commands like df -h or du -sh.
- Identify any large or unnecessary files consuming disk space.
- Rotate and compress MySQL error logs to free up space (logrotate can be configured for this).
- Delete old backups or unused data to reclaim disk space.
- Consider adding additional storage or expanding existing volumes if disk space constraints persist.
- 7. SST Failure:
- Scenario: State Snapshot Transfer (SST) fails during node initialization or cluster join process.
- Troubleshooting Steps:
- Review MySQL error logs for SST-related errors or timeouts.
- Check if SST method and authentication credentials are correctly configured in MySQL settings.
- Ensure that the SST donor node has enough resources and network connectivity to perform SST.
- Verify that firewall rules allow SST traffic between nodes on the specified ports (usually 4444 or 4567).
- If using xtrabackup-v2 for SST, check for any issues with xtrabackup installation or permissions.
- 8. Schema Drift:
- Scenario: Schema changes are applied to one node but not propagated to other nodes, causing inconsistency.
- Troubleshooting Steps:
- Compare schema definitions between nodes using tools like Percona Toolkit’s pt-table-sync or pt-schema-change.
- Review MySQL replication status to ensure replication threads are running without errors.
- Check for any differences in MySQL configuration (my.cnf) that may affect schema replication.
- If schema changes were performed manually, ensure they are replicated to other nodes or apply them manually if necessary.
- Monitor for schema conflicts or replication errors and address them promptly to maintain consistency across the cluster.
- 9. High Load on Specific Nodes:
- Scenario: Some nodes in the cluster experience unusually high load or resource utilization.
- Troubleshooting Steps:
- Identify the cause of high load by monitoring CPU, memory, disk I/O, and network usage on affected nodes.
- Check for long-running queries or transactions using tools like SHOW PROCESSLIST or pt-query-digest.
- Investigate if any specific database operations or application activities are contributing to the load.
- Consider redistributing database workload by adjusting load balancing or routing rules.
- Scale up or add additional nodes to the cluster to distribute the load more evenly if necessary.
- 10. Backup and Restore Failure:
- Scenario: Backup or restore operations fail, preventing data protection or recovery.
- Troubleshooting Steps:
- Review backup and restore logs for any errors or warnings.
- Verify that backup and restore tools (e.g., Percona XtraBackup) are correctly installed and configured.
- Check if backup storage has sufficient space and proper permissions for writing backups.
- Ensure that the SST user credentials used for backup and restore operations are valid and have appropriate privileges.
- Test backup and restore procedures in a controlled environment to identify and address any issues before performing them in production.
- 11. Slow Replication:
- Scenario: Replication between nodes in the cluster is slow, leading to data inconsistency or lag.
- Troubleshooting Steps:
- Monitor replication lag using tools like SHOW SLAVE STATUS\G or Percona Monitoring and Management (PMM).
- Check for network latency or bandwidth issues between nodes using tools like ping or iperf.
- Review MySQL error logs for any replication errors or warnings.
- Ensure that the network settings, such as net_read_timeout and net_write_timeout, are appropriately configured.
- Optimize database performance by tuning MySQL settings related to replication (e.g., innodb_flush_log_at_trx_commit, innodb_log_buffer_size).
- Consider adjusting the Galera settings, such as pc.sync_donor, to optimize replication performance.
- 12. Data Corruption:
- Scenario: Data corruption occurs on one or more nodes, leading to unexpected behavior or errors.
- Troubleshooting Steps:
- Use checksums to verify data integrity on each node using tools like pt-table-checksum.
- Review MySQL error logs for any indications of data corruption or inconsistencies.
- Check disk health and integrity using tools like smartctl or filesystem checkers (fsck).
- Investigate potential hardware issues such as faulty disks, memory errors, or CPU problems.
- If data corruption is detected, restore the affected data from a recent backup or a healthy node in the cluster.
- Implement preventive measures such as regular backups, monitoring, and proactive maintenance to minimize the risk of data corruption.
- 13. Cluster Split Brain:
- Scenario: The cluster experiences a split-brain situation, where multiple partitions form independently.
- Troubleshooting Steps:
- Use tools like SHOW GLOBAL STATUS LIKE ‘wsrep_cluster_status’; to identify if the cluster is in a split-brain state.
- Analyze network logs and configurations to determine the cause of the split-brain situation.
- Implement quorum-based configurations to prevent split-brain scenarios in the future.
- Manually intervene to merge the partitions by selecting a primary partition and shutting down nodes in other partitions.
- Review the Galera documentation and best practices for handling split-brain situations for more guidance.
- 14. Resource Contention:
- Scenario: Nodes in the cluster contend for shared resources, leading to performance degradation or instability.
- Troubleshooting Steps:
- Monitor resource utilization metrics such as CPU, memory, disk I/O, and network bandwidth on each node.
- Identify any resource-intensive queries or operations using performance monitoring tools.
- Adjust Galera and MySQL configuration parameters related to resource management (e.g., wsrep_provider_options, max_connections, innodb_buffer_pool_size).
- Implement resource isolation techniques such as containerization or virtualization to allocate resources more effectively.
- Consider horizontal scaling by adding more nodes to the cluster or distributing the workload across multiple clusters to alleviate resource contention.
- 15. Authentication Issues:
- Scenario: Users encounter authentication problems when accessing the database cluster.
- Troubleshooting Steps:
- Verify the user credentials and ensure that the correct username and password are used for authentication.
- Check MySQL user privileges using commands like SHOW GRANTS FOR ‘username’@’host’; to ensure the user has the necessary permissions.
- Review MySQL error logs for any authentication-related errors or warnings.
- Ensure that authentication plugins and mechanisms (e.g., mysql_native_password, caching_sha2_password) are configured correctly.
- If using external authentication methods (e.g., LDAP, Kerberos), verify the configuration and connectivity to the authentication server.
- Test authentication using different MySQL clients and connection methods to identify any client-specific issues.
- 16. Cluster Backup Strategy:
- Scenario: The cluster backup strategy is ineffective or insufficient for ensuring data protection and disaster recovery.
- Troubleshooting Steps:
- Review the existing backup strategy, including backup frequency, retention policies, and backup verification methods.
- Assess backup storage capacity, reliability, and accessibility to ensure backups can be stored securely and retrieved when needed.
- Evaluate backup tools and techniques (e.g., Percona XtraBackup, mysqldump) to determine if they meet the organization’s backup requirements.
- Test backup and restore procedures regularly to verify data recoverability and effectiveness of the backup strategy.
- Consider implementing additional backup mechanisms such as incremental backups, off-site backups, or cloud-based backup solutions for redundancy and resilience.
- 17. Cluster Monitoring and Alerting:
- Scenario: The cluster lacks comprehensive monitoring and alerting capabilities, leading to delays in detecting and resolving issues.
- Troubleshooting Steps:
- Assess current monitoring tools and solutions (e.g., Percona Monitoring and Management, Prometheus/Grafana) to determine if they provide adequate visibility into cluster health and performance.
- Define key performance indicators (KPIs) and thresholds for monitoring critical metrics such as node status, replication lag, and resource utilization.
- Configure alerting rules and notifications to promptly notify administrators of any abnormal or critical conditions in the cluster.
- Regularly review and fine-tune monitoring configurations based on evolving cluster requirements and operational experiences.
- Train staff on monitoring tools and procedures to ensure effective utilization and response to monitoring alerts.
- 18. Cluster Configuration Management:
- Scenario: Configuration changes are made inconsistently across cluster nodes, leading to configuration drift and potential issues.
- Troubleshooting Steps:
- Establish a centralized configuration management system (e.g., Ansible, Puppet, Chef) to manage and enforce consistent configuration across all cluster nodes.
- Document cluster configuration settings, including MySQL configuration parameters, Galera settings, and cluster topology, to maintain a single source of truth.
- Implement configuration version control and change management processes to track and audit configuration changes over time.
- Regularly audit cluster configurations to identify any deviations from the desired state and take corrective actions as needed.
- Automate configuration deployment and validation processes to streamline cluster maintenance and reduce human error.
Advantages of Percona MySQL Cluster Setup
- High Availability: Percona XtraDB Cluster allows all nodes to act as masters, ensuring continuous availability of your database.
- Scalability: With synchronous replication and read scalability, the cluster can handle increasing workloads by adding more nodes.
- Data Integrity: Percona XtraDB Cluster ensures data integrity through synchronous replication, providing consistency across all nodes.
- Automatic Node Provisioning: Bootstrapping the cluster and using tools like SST and IST simplify node provisioning and maintenance.
- HAProxy Load Balancer: HAProxy provides efficient load balancing, distributing incoming database connections across cluster nodes for optimal performance and fault tolerance.
- Percona Monitoring and Troubleshooting: PMM enables comprehensive monitoring and troubleshooting of the cluster, ensuring proactive maintenance and quick resolution of issues.
By implementing this cluster setup, you can create a robust and scalable database infrastructure that meets the demands of modern applications while ensuring data integrity and high availability.


Hi there, I found your blog by means of Google at the same time as looking for a related topic, your site got here up, it looks good. I have bookmarked it in my google bookmarks.
I found your insights on email list segmentation to be extremely useful.
thanks for your feedback
Valuable information. Lucky me I discovered your site unintentionally, and I am shocked why this accident did not came about earlier! I bookmarked it.
I抦 not that much of a online reader to be honest but your blogs really nice, keep it up! I’ll go ahead and bookmark your website to come back down the road. All the best