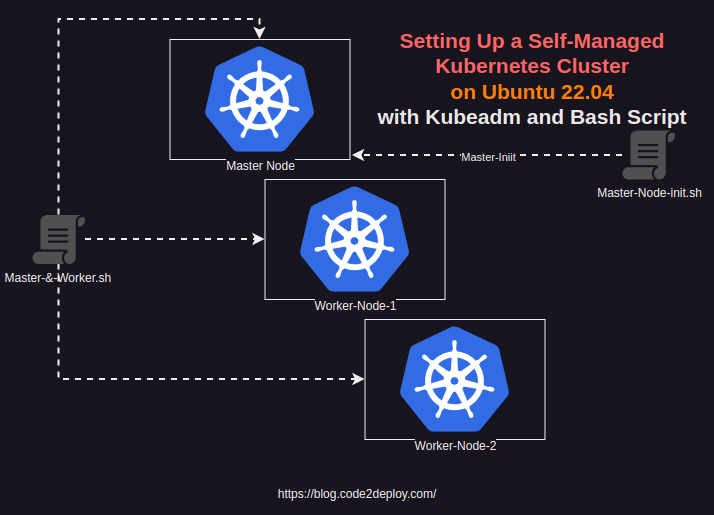
In this tutorial, we’ll walk through the process of setting up a Kubernetes cluster on Ubuntu 22.04 using Kubeadm, focusing on an on-premise environment with specific hardware and software prerequisites.
Hardware Prerequisites:
Master Node:
- Minimum 4GB RAM, 4 Core CPU
- 1GB Ethernet NIC
- 40GB Hard Disk Space
Worker Node:
- Minimum 2GB RAM, 2 Core CPU
Software Prerequisites:
Container Runtime:
- Docker, CRI-O, ContainerD (Choose one)
Kubernetes Tools:
- Kubeadm
- Kubectl
- Kubelet
- Kubernetes CNI
Installation Steps:
1. Prepare the Environment:
Ensure SWAP memory is disabled and necessary prerequisites are installed on both master and worker nodes. This includes the container runtime, Kubeadm, Kubectl, Kubelet, and Kubernetes CNI.
Bash-Script-1: This script is for both servers(Master and Worker Node), run this script on both servers
Step-1:
Copy the script and make a sh file on your on-prem Master and Worker Nodes
| sudo vim common-k8s.sh |
| #!/bin/bash # # Common setup for all servers (Control Plane and Nodes) set -euxo pipefail # Kuernetes Variable Declaration KUBERNETES_VERSION=”1.29.0-1.1″ # disable swap sudo swapoff -a # keeps the swaf off during reboot (crontab -l 2>/dev/null; echo “@reboot /sbin/swapoff -a”) | crontab – || true sudo apt-get update -y # Install CRI-O Runtime OS=”xUbuntu_22.04″ VERSION=”1.28″ # Create the .conf file to load the modules at bootup cat <<EOF | sudo tee /etc/modules-load.d/k8s.conf overlay br_netfilter EOF sudo modprobe overlay sudo modprobe br_netfilter # sysctl params required by setup, params persist across reboots cat <<EOF | sudo tee /etc/sysctl.d/k8s.conf net.bridge.bridge-nf-call-iptables = 1 net.bridge.bridge-nf-call-ip6tables = 1 net.ipv4.ip_forward = 1 EOF # Apply sysctl params without reboot sudo sysctl –system cat <<EOF | sudo tee /etc/apt/sources.list.d/devel:kubic:libcontainers:stable.list deb https://download.opensuse.org/repositories/devel:/kubic:/libcontainers:/stable/$OS/ / EOF cat <<EOF | sudo tee /etc/apt/sources.list.d/devel:kubic:libcontainers:stable:cri-o:$VERSION.list deb http://download.opensuse.org/repositories/devel:/kubic:/libcontainers:/stable:/cri-o:/$VERSION/$OS/ / EOF curl -L https://download.opensuse.org/repositories/devel:kubic:libcontainers:stable:cri-o:$VERSION/$OS/Release.key | sudo apt-key –keyring /etc/apt/trusted.gpg.d/libcontainers.gpg add – curl -L https://download.opensuse.org/repositories/devel:/kubic:/libcontainers:/stable/$OS/Release.key | sudo apt-key –keyring /etc/apt/trusted.gpg.d/libcontainers.gpg add – sudo apt-get update sudo apt-get install cri-o cri-o-runc -y sudo systemctl daemon-reload sudo systemctl enable crio –now echo “CRI runtime installed susccessfully” # Install kubelet, kubectl and Kubeadm sudo apt-get update -y sudo apt-get install -y apt-transport-https ca-certificates curl gpg curl -fsSL https://pkgs.k8s.io/core:/stable:/v1.28/deb/Release.key | sudo gpg –dearmor -o /etc/apt/keyrings/kubernetes-1-28-apt-keyring.gpg echo ‘deb [signed-by=/etc/apt/keyrings/kubernetes-1-28-apt-keyring.gpg] https://pkgs.k8s.io/core:/stable:/v1.28/deb/ /’ | sudo tee /etc/apt/sources.list.d/kubernetes-1.28.list curl -fsSL https://pkgs.k8s.io/core:/stable:/v1.29/deb/Release.key | sudo gpg –dearmor -o /etc/apt/keyrings/kubernetes-1-29-apt-keyring.gpg echo ‘deb [signed-by=/etc/apt/keyrings/kubernetes-1-29-apt-keyring.gpg] https://pkgs.k8s.io/core:/stable:/v1.29/deb/ /’ | sudo tee /etc/apt/sources.list.d/kubernetes-1.29.list sudo apt-get update -y sudo apt-get install -y kubelet=”$KUBERNETES_VERSION” kubectl=”$KUBERNETES_VERSION” kubeadm=”$KUBERNETES_VERSION” sudo apt-get update -y sudo apt-mark hold kubelet kubeadm kubectl sudo apt-get install -y jq local_ip=”$(ip –json addr show eth0 | jq -r ‘.[0].addr_info[] | select(.family == “inet”) | .local’)” cat > /etc/default/kubelet << EOF KUBELET_EXTRA_ARGS=–node-ip=$local_ip EOF |
Allow the execution permission
| sudo chmod +x common-k8s.sh#run the script sudo ./common-k8s.sh |
2. Initialize Kubernetes Cluster:
Bash-Script-2: this script is only for the Master, run this script on the master node.
Step-2
Copy the script and make a sh file on your on-prem Master Node
| sudo vim master-init-k8s.sh |
Note: if you use public IP set here PUBLIC_IP_ACCESS=“true”
If you use private IP you must change it PUBLIC_IP_ACCESS=“false”
| #!/bin/bash # # Setup for Control Plane (Master) servers set -euxo pipefail # If you need public access to API server using the servers Public IP adress, change PUBLIC_IP_ACCESS to true. PUBLIC_IP_ACCESS=“true” NODENAME=$(hostname -s) POD_CIDR=“192.168.0.0/16” # Pull required images sudo kubeadm config images pull # Initialize kubeadm based on PUBLIC_IP_ACCESS if [[ “$PUBLIC_IP_ACCESS“ == “false” ]]; then MASTER_PRIVATE_IP=$(ip addr show eth0 | awk ‘/inet / {print $2}’ | cut -d/ -f1) sudo kubeadm init –apiserver-advertise-address=“$MASTER_PRIVATE_IP“ –apiserver-cert-extra-sans=“$MASTER_PRIVATE_IP“ –pod-network-cidr=“$POD_CIDR“ –node-name “$NODENAME“ –ignore-preflight-errors Swap elif [[ “$PUBLIC_IP_ACCESS“ == “true” ]]; then MASTER_PUBLIC_IP=$(curl ifconfig.me && echo “”) sudo kubeadm init –control-plane-endpoint=“$MASTER_PUBLIC_IP“ –apiserver-cert-extra-sans=“$MASTER_PUBLIC_IP“ –pod-network-cidr=“$POD_CIDR“ –node-name “$NODENAME“ –ignore-preflight-errors Swap else echo “Error: MASTER_PUBLIC_IP has an invalid value: $PUBLIC_IP_ACCESS“ exit 1 fi # Configure kubeconfig mkdir -p “$HOME“/.kube sudo cp -i /etc/kubernetes/admin.conf “$HOME“/.kube/config sudo chown “$(id -u)“:“$(id -g)“ “$HOME“/.kube/config # Install Claico Network Plugin Network kubectl apply -f https://docs.projectcalico.org/manifests/calico.yaml |
Allow the execution permission
| sudo chmod +x master-init-k8s.sh#run the script sudo ./master-init-k8s.sh |
Step-3:
Join the worker node into the master node:
After initializing the master node you will get the worker node join token, and run the join command.
Step-4
Verify the worker node is connected
| kubectl get node |
3. Configure kubectl:
Copy the kube config file from the master node to your local workstation.
| mkdir ~/.kube scp user@master-node:/etc/kubernetes/admin.conf ~/.kube/config |
Imperative Way of Managing Kubernetes Resources:
Pod Operations:
| # Create a pod with dry run kubectl run todo-express –image=enam92/todo-express:v1 –dry-run=client # Expose pod using NodePort service kubectl expose pod todo-express –port=3000 –type=NodePort # Inspect pod details kubectl get pods -o wide kubectl logs todo-express kubectl exec -ti todo-express — bash # Delete pod kubectl delete pod todo-express |
Service Operations:
| # Delete service kubectl delete service <ServiceName> # Expose deployment kubectl expose deployment todo-express –port=3000 –type=NodePort |
Deployment Operations:
| # Create deployment kubectl create deployment todo-express –image=enam92/todo-express:v1 # Scale replicas kubectl scale deployments todo-express –replicas=3 |
Kubernetes Manifest Examples:
Deployment Demo Manifest:
| apiVersion: apps/v1 kind: Deployment metadata: name: my-deployment # Name of the Deployment spec: replicas: 3 # Desired number of replicas selector: matchLabels: app: my-app # Label selector to match Pods controlled by this Deployment template: # Template for creating Pods metadata: labels: app: my-app # Labels for Pods created from this template spec: containers: # List of containers in the Pod – name: nginx-container # Name of the container image: nginx:latest # Container image to use |
Pod Demo Manifest:
| apiVersion: v1 kind: Pod metadata: name: my-pod # Name of the Pod spec: containers: # List of containers in the Pod – name: nginx-container # Name of the container image: nginx:latest # Container image to use |
Service Demo Manifest:
| apiVersion: v1 kind: Service metadata: name: my-service # Name of the Service spec: selector: app: my-app # Label selector to match Pods ports: – protocol: TCP port: 80 # Port exposed by the Service targetPort: 80 # Port on the Pods |
Ingres Demo Manifest:
| apiVersion: networking.k8s.io/v1 kind: Ingress metadata: name: my-ingress # Name of the Ingress spec: rules: – http: paths: – path: / # Path for the Ingress pathType: Prefix backend: service: name: my-service # Service to forward traffic to port: number: 80 # Port of the Service |
Config-Map Demo Manifest:
| apiVersion: v1 kind: ConfigMap metadata: name: my-configmap # Name of the ConfigMap data: key1: value1 # Key-value pairs with configuration data key2: value2 |
Persistent-Volume Demo Manifest:
| apiVersion: v1 kind: PersistentVolume metadata: name: my-pv # Name of the PersistentVolume spec: capacity: storage: 1Gi # Capacity of the volume volumeMode: Filesystem accessModes: – ReadWriteOnce # Access mode for the volume persistentVolumeReclaimPolicy: Retain storageClassName: standard # Storage class for dynamic provisioning hostPath: path: /data/my-pv # Path on the host machine |
Persistent-VolumeClaim Demo Manifest:
| apiVersion: v1 kind: PersistentVolumeClaim metadata: name: my-pvc # Name of the PersistentVolumeClaim spec: accessModes: – ReadWriteOnce # Access mode for the claim resources: requests: storage: 500Mi # Requested storage capacity |
ReplicaController Demo Manifest:
| apiVersion: v1 kind: ReplicationController metadata: name: myapp-rc labels: app: myapp type: frontend spec: template: metadata: name: myapp-pod labels: app: myapp type: frontend spec: containers: – name: nginx-container image: nginx replicas: 3 |
Replicaset Demo Manifest:
| apiVersion: apps/v1 kind: ReplicaSet metadata: name: myapp-rc labels: app: myapp type: frontend spec: template: metadata: name: myapp-pod labels: app: myapp type: frontend spec: containers: – name: nginx-container image: nginx replicas: 3 selector: matchLabels: type: frontend |
Replicaset OP Commands:
| kubectl create -f replicaset-definiation.yaml Kubectl get replicaset myapp-replicaset kubectl delete replicaset myapp-replicaset kubectl replace -f replicaset-definition.yml kubectl scale -replicas=6 -f replicaset-definition.yml |
Follow these steps and examples to set up and manage your Kubernetes cluster effectively. Kubernetes provides powerful features for orchestrating and managing containerized applications at scale, enabling efficient resource utilization and automated deployment processes.