In this project, we will embark on a comprehensive journey to learn the entire process from development to deployment and release. We will use a Java-Maven demo application to demonstrate the various stages and tools involved in modern DevOps practices. Our focus will include Docker, Docker image versioning, Kubernetes deployment, Jenkins CI/CD, Trivy, NexusHub, GitHub, SonarQube, Prometheus, Grafana, and webhooks. Throughout this project, we will cover the following key areas:
- Infrastructure Preparation: Setting up the necessary environments and tools.
- Integration: Integrating various DevOps tools and technologies.
- Code Deployment: Deploying the application code.
- Code Scanning: Using tools to ensure code quality and security.
- Container Image Scanning: Ensuring the security of Docker images.
- Artifact Versioning: Managing different versions of artifacts.
- CI/CD Pipeline Preparation: Building and deploying pipelines using Jenkins.
- Kubernetes Deployment: Deploying applications on Kubernetes clusters.
- Service Management: Setting up services in Kubernetes.
- Role-Based Access Control (RBAC): Implementing security and access controls.
DevOps Tools and Technology
Jenkins
Jenkins is an open-source automation server used to automate the building, testing, and deployment of applications. It supports continuous integration and continuous delivery (CI/CD) pipelines, enabling developers to efficiently integrate changes and deploy updates.
Docker
Docker is a platform that allows developers to automate the deployment of applications inside lightweight, portable containers. Containers ensure that software runs consistently across different environments.
Docker Registry
A Docker Registry is a storage and distribution system for Docker images. It allows teams to share images within an organization or with the public. Docker Hub is a popular public registry, but private registries can also be set up for internal use.
Kubernetes
Kubernetes is an open-source container orchestration platform that automates the deployment, scaling, and management of containerized applications. It helps in managing large clusters of containers, ensuring high availability and fault tolerance.
SonarQube
SonarQube is a tool for continuous inspection of code quality. It performs automatic reviews with static analysis to detect bugs, code smells, and security vulnerabilities in your codebase, helping maintain high code quality standards.
Trivy
Trivy is a comprehensive and easy-to-use security scanner for container images. It detects vulnerabilities, configuration issues, and secrets in container images, ensuring that images are secure before they are deployed.
NexusHub
NexusHub (also known as Nexus Repository) is a repository manager that supports multiple repository formats. It stores and manages artifacts required for development and deployment, such as libraries, dependencies, and Docker images, ensuring efficient and organized artifact management.
Prometheus and Grafana
Prometheus is an open-source monitoring and alerting toolkit, designed to record real-time metrics in a time-series database. Grafana is a data visualization and monitoring tool that integrates with Prometheus to provide powerful, customizable dashboards for monitoring system performance and health.
Journey Overview
- Infrastructure Setup: We’ll begin by setting up the necessary infrastructure on different servers for Jenkins, SonarQube, and NexusHub. Each of these tools will be installed and configured to work seamlessly with our project.
- Continuous Integration: Using Jenkins, we’ll automate the build and test processes. Jenkins will pull the latest code from GitHub, compile it using Maven, and run tests to ensure code quality.
- Code Quality Analysis: We’ll integrate SonarQube with Jenkins to perform static code analysis, identifying potential bugs and security vulnerabilities in our Java-Maven application.
- Containerization: The application will be containerized using Docker. We’ll build Docker images and use Trivy to scan these images for vulnerabilities, ensuring they are secure before deployment.
- Artifact Management: NexusHub will manage our built artifacts and Docker images, providing version control and ensuring that we can consistently reproduce builds.
- Continuous Deployment: The Docker images will be deployed to a Kubernetes cluster. Jenkins will automate the deployment process, ensuring that the latest version of the application is always running.
- Monitoring and Alerting: Prometheus and Grafana will be set up to monitor the application’s performance and health. Grafana dashboards will visualize metrics collected by Prometheus, providing insights into the application’s behavior.
- Security and Access Control: We’ll implement role-based access control (RBAC) in Kubernetes to manage permissions and ensure that only authorized users can perform specific actions.
Prerequisites
- Git Repository account
- Make a Git repo and push the provided repo to the newly created repo.
- Dockerhub account
- Make a dockerhub account if you haven’t.
- Jenkins Server
- Create VM/Instance(Minimum 4GB RAM and 20GB Storage)
- SonarQube Server
- Create VM/Instance(Minimum 4GB RAM and 20GB Storage)
- NexusHub Server
- Create VM/Instance(Minimum 4GB RAM and 20GB Storage)
- Managed or SelfManaged Kubernetes Cluster
- Two nodes one for the master and another one for the worker (Minimum 4GB RAM, 2CoreCPU, and 30GB Storage)
- Monitoring Server
- Create VM/Instance(Minimum 4GB RAM and 20GB Storage)
Pipeline Architecture
Installation Process Step by Step
Step 1: SonarQube Server
SonarQube Server Installation and Configuration
To install and configure the SonarQube Server, follow the provided installation script. Run the script on your SonarQube-Server.
Step 2: NexusHub Server
NexusHub Server Installation and Configuration
To install and configure the NexusHub Server, follow the provided installation script. Run the script on your Nexus Server.
Step 3: Kubernetes Cluster Preparation
To set up the Kubernetes cluster, follow the provided installation script. Run the script on both your Kubernetes Worker Node and Master Node.
Step 4: Jenkins Server Installation
- Jenkins Installation
To install Jenkins, follow the provided installation script and run it on your Jenkins server.
- Plugin Installation and Configuration
Install and configure the necessary Jenkins plugins.
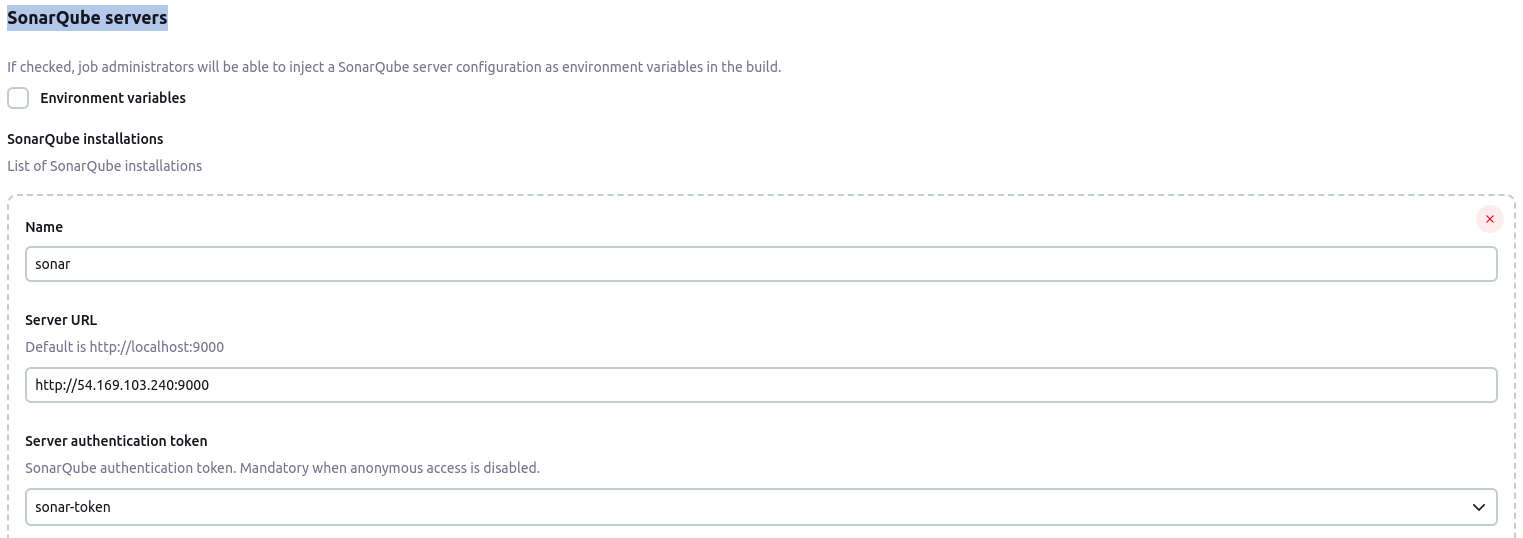
- SonarQube Secret Creation and Integration
Create and Integrate SonarQube Secrets in Jenkins for Code Quality Analysis
To set up the SonarQube plugin and configure settings in Jenkins, follow these steps:
- Navigate to Jenkins Configuration:
- Go to http://Jenkins-Server-IP:8080/manage/configure.
- Configure SonarQube Servers:
- Scroll down to SonarQube servers and click Add SonarQube.
- Fill in the following details:
- Name: sonar
- Server URL: http://sonarqube-server-ip:9000
- Server authentication token: sonar-token
Refer to the image below for a detailed guide.
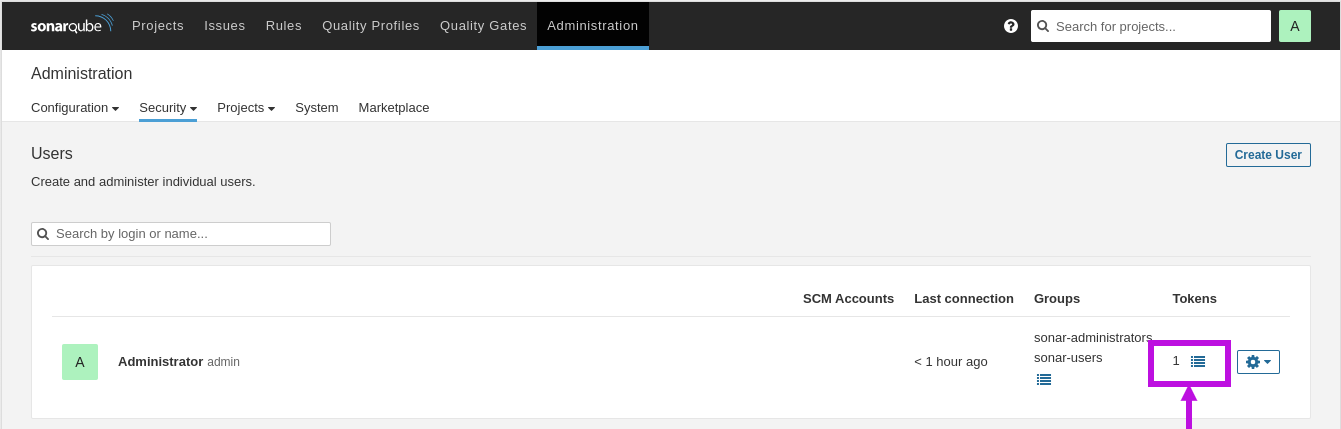
Note: To collect Sonar tokens, follow these steps:
- Navigate to http://SonarServerIP:9000/admin/users.
- Click on the specified icon below.
- Enter the token name as [sonar-token].
- Click the Generate button.
- Copy the generated token to create a sonar-auth-credential in Jenkins.
To create the SonarQube credential in Jenkins, follow these steps:
- Navigate to http://Jenkins-Server-IP:8080/manage/credentials/store/system/domain/_/newCredentials.
- In the Kind dropdown, select Secret Text.
- Paste the token you copied from SonarQube into the Secret field.
- Enter sonar-token in the ID field.
- Refer to the image below for detailed guidance.

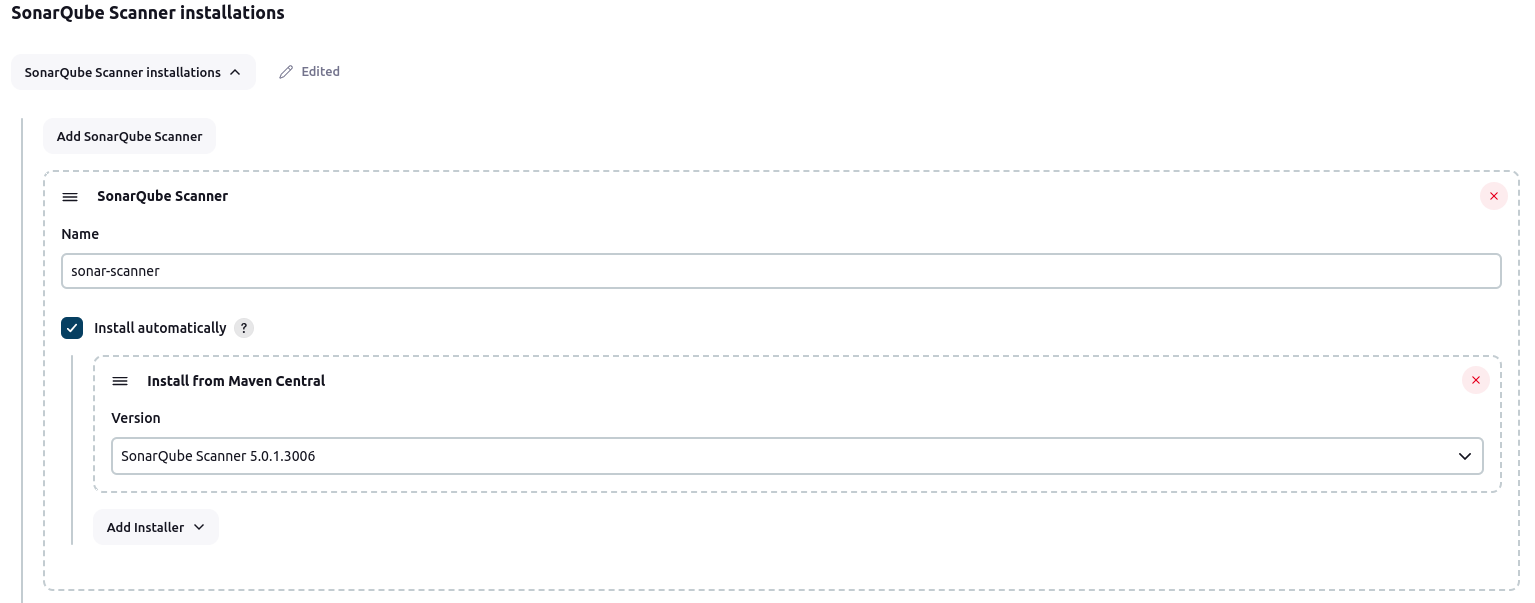
Next, configure the SonarQube Scanner in Jenkins:
- Navigate to http://Jenkins-Server-IP:8080/manage/configureTools.
- Set up the SonarQube Scanner installation as shown in the image below:
- Select SonarQube Scanner Installations.
- Enter the Name as sonar-scanner.
- Check the Install automatically box.
- Choose the appropriate SonarQube version.
Refer to the image below for detailed guidance.
Purpose of SonarQube Quality Gate
SonarQube Quality Gates are used to enforce code quality standards by defining a set of conditions that your code must meet before it can be considered acceptable. This helps ensure that your project maintains high quality and adheres to best practices.
Setting Up the SonarQube Quality Gate
To set up the SonarQube Quality Gate, follow these steps:
- Navigate to Webhooks in SonarQube:
- Go to http://SonarQube-Server-IP:9000/admin/webhooks.
- Create a New Webhook:
- Click on the Create button on the right side of the page to access the webhook creation interface (as shown in the image below).
- Enter the Webhook Name as jenkins.
- Enter the URL as http://Jenkins-Server-IP:8080/sonarqube-webhook/.
- Click on the Create button to save the webhook.
Refer to the image below for detailed guidance.


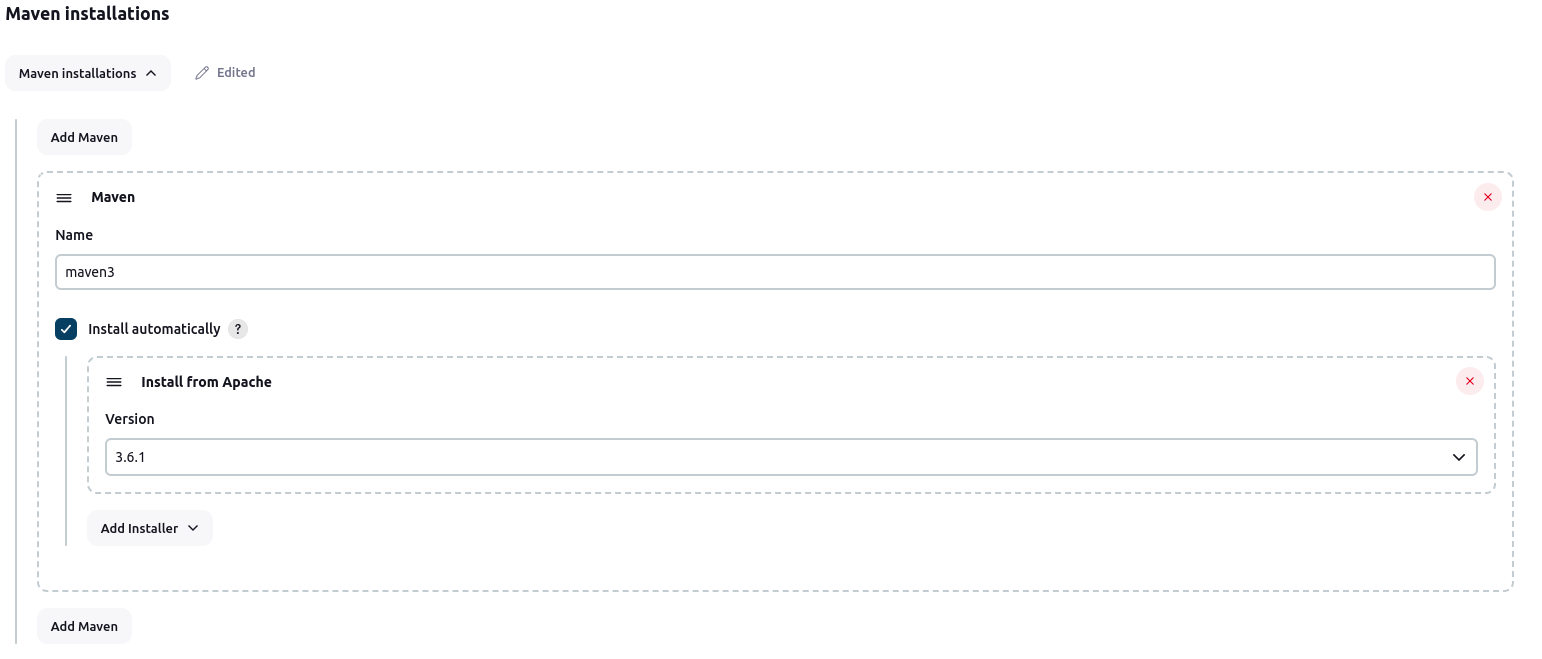
Setting Up Maven in Jenkins
To configure Maven in Jenkins, follow these steps:
- Navigate to Maven Installations:
- On the same Jenkins configuration page, scroll down to Maven Installations.
- Configure Maven Installation:
- Click on Add Maven.
- Enter the Name as maven3.
- Check the Install automatically box.
- Select the desired Maven version based on your project requirements.
Refer to the image below for detailed guidance.
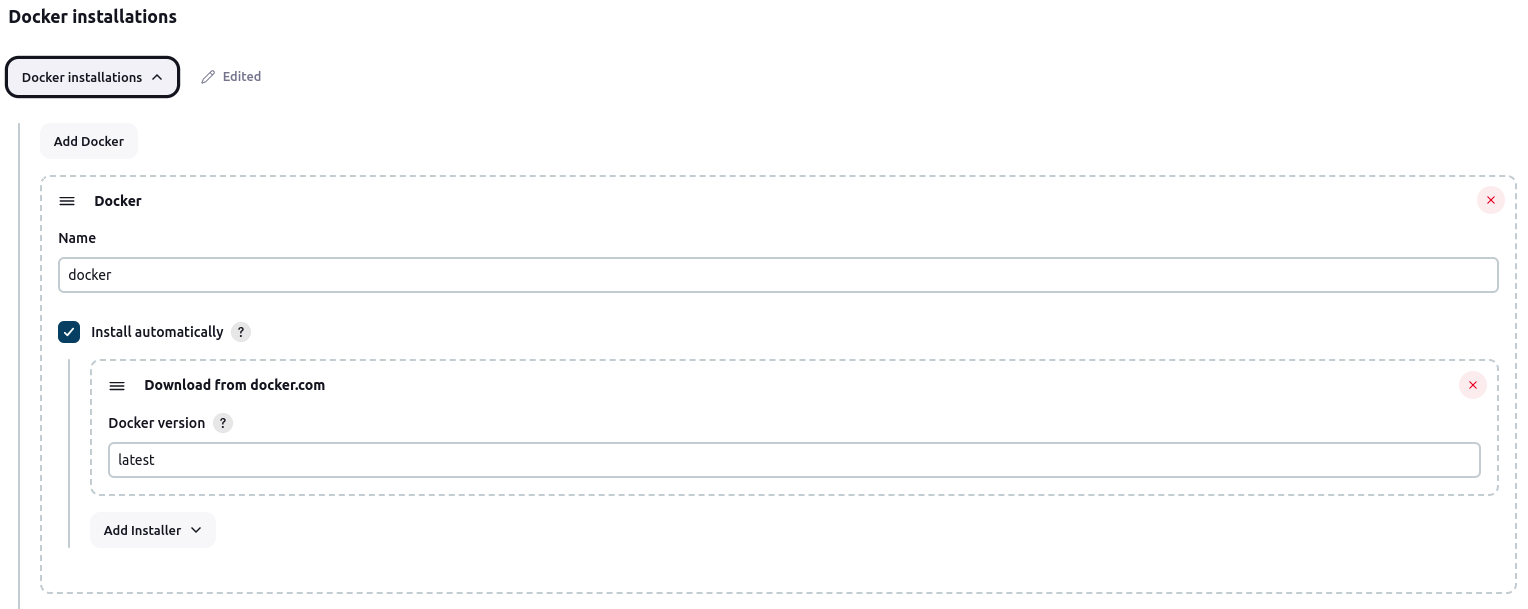
Setting Up the Docker Plugin in Jenkins
To configure Docker in Jenkins, follow these steps:
- Navigate to Docker Installations:
- On the same Jenkins configuration page, scroll down to Docker Installations.
- Configure Docker Installation:
- Click on Add Docker.
- Enter the Name as docker.
- Check the Install automatically box.
- Select the Docker version as latest, based on your project requirements.
Refer to the image below for detailed guidance.
- GitHub Secret Creation and Integration
- Generate a GitHub Personal Access Token:
- Navigate to GitHub Settings.
- Click on Developer Settings on the left side of the page.
- Select Personal Access Tokens.
- Click on Generate new token (classic).
- Enter the Token Name and select the Expiration Date.
- Check the necessary permissions.
- Click on Generate Token and copy the token. Keep it in a secure file for future use.
- Add the GitHub Token to Jenkins Credentials:
- Go to Jenkins Global Credentials.
- Select Secret text as the kind of credential.
- Enter your GitHub username.
- Paste the Personal Access Token you created in GitHub.
- Set the Credential ID to git-cred.
- Click on the Create button.
This process secures your GitHub operations within Jenkins by integrating your GitHub secrets securely.
- NexusHub Secret Creation and Integration
Creating and Integrating NexusHub Secrets in Jenkins for Artifact Management
- Configure Jenkins Global Settings:
- Navigate to Jenkins Global Configuration.
- Set the ID and Name as global-settings.
- Add a Comment for reference as [global-settings].
- Edit the XML script below and provide the NexusHub admin user and password.
- If needed, copy the XML script from the Git repository and make the necessary edits.
Refer to the image below for a visual guide on configuring NexusHub secrets in Jenkins.
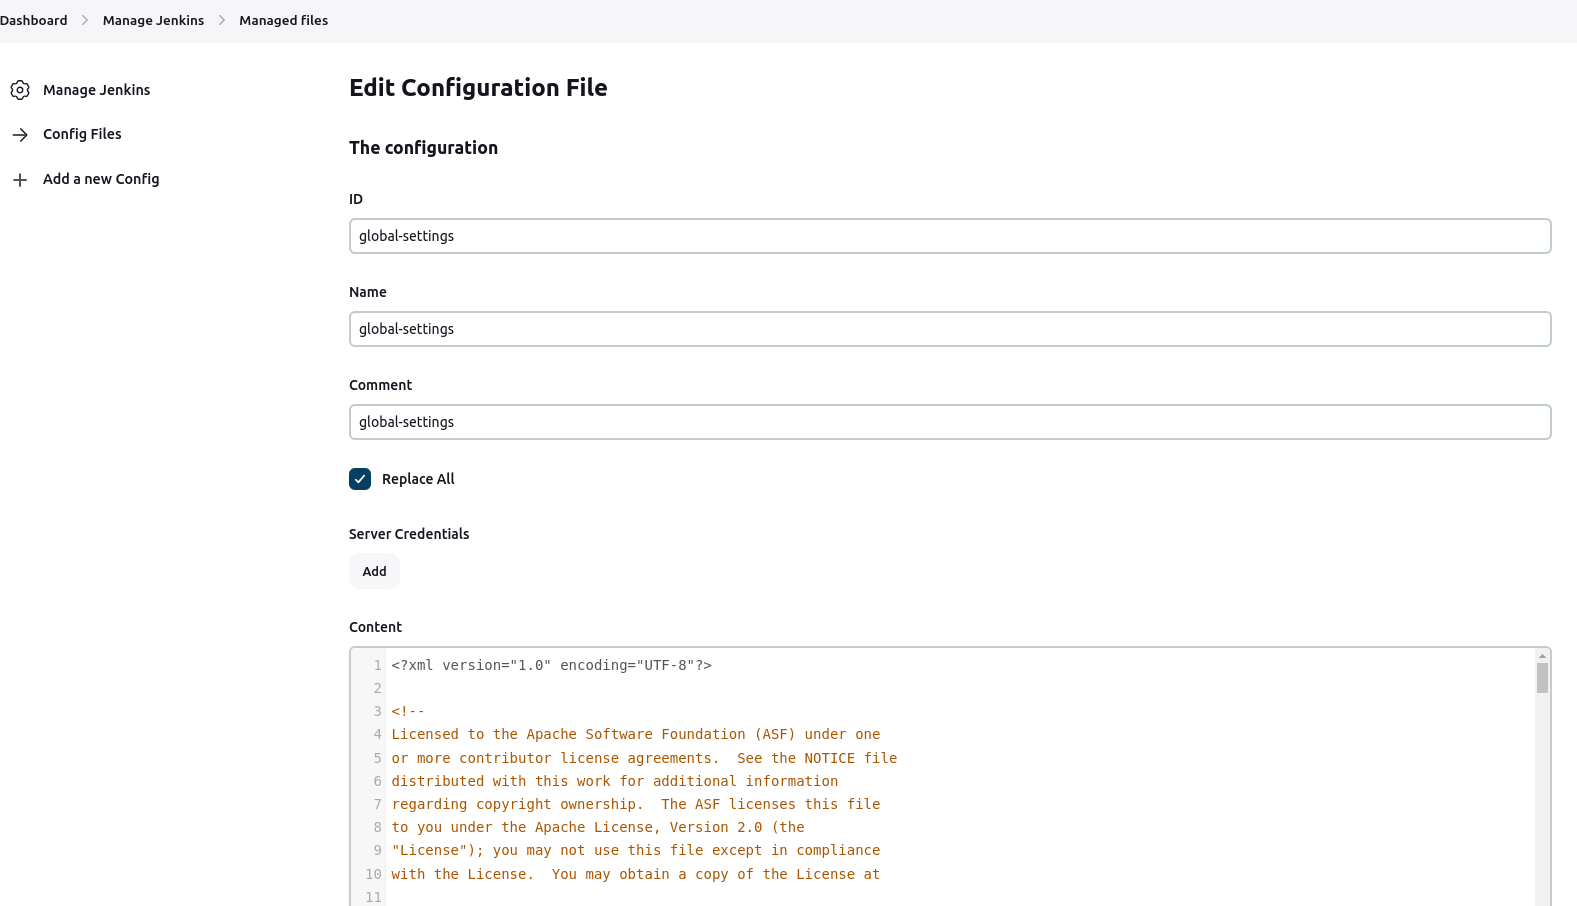
| –> <server> <id>maven-releases</id> <username>admin</username> <password>Password</password> </server> <server> <id>maven-snapshots</id> <username>admin</username> <password>Password</password> </server> <!– Another sample, using keys to authenticate. <server> <id>siteServer</id> <privateKey>/path/to/private/key</privateKey> <passphrase>optional; leave empty if not used.</passphrase> </server> –> |
To configure the pom.xml file, follow these steps:
- Open the pom.xml file.
- Locate the last two lines of the file.
- Replace the placeholder Nexus-Server-IP with the IP address of your Nexus server.
| <distributionManagement> <repository> <id>maven-releases</id > <url>http://Nuexus-Server-IP:8081/repository/maven-releases/</url> </repository> <snapshotRepository> <id>maven-snapshots</id> <url>http://Nuexus-Server-IP:8081/repository/maven-snapshots/</url> </snapshotRepository> </distributionManagement> |
- Trivy Installation and Integration
Install Trivy on the Jenkins server for container image scanning and integrate it with Jenkins.
- Docker Installation and Configuration
Install Docker on the Jenkins server and configure it to build and manage container images.
- Kubernetes CLI Installation
Install the Kubernetes command-line tool (kubectl) on the Jenkins server for deploying applications to the Kubernetes cluster. To install kubectl use this script.
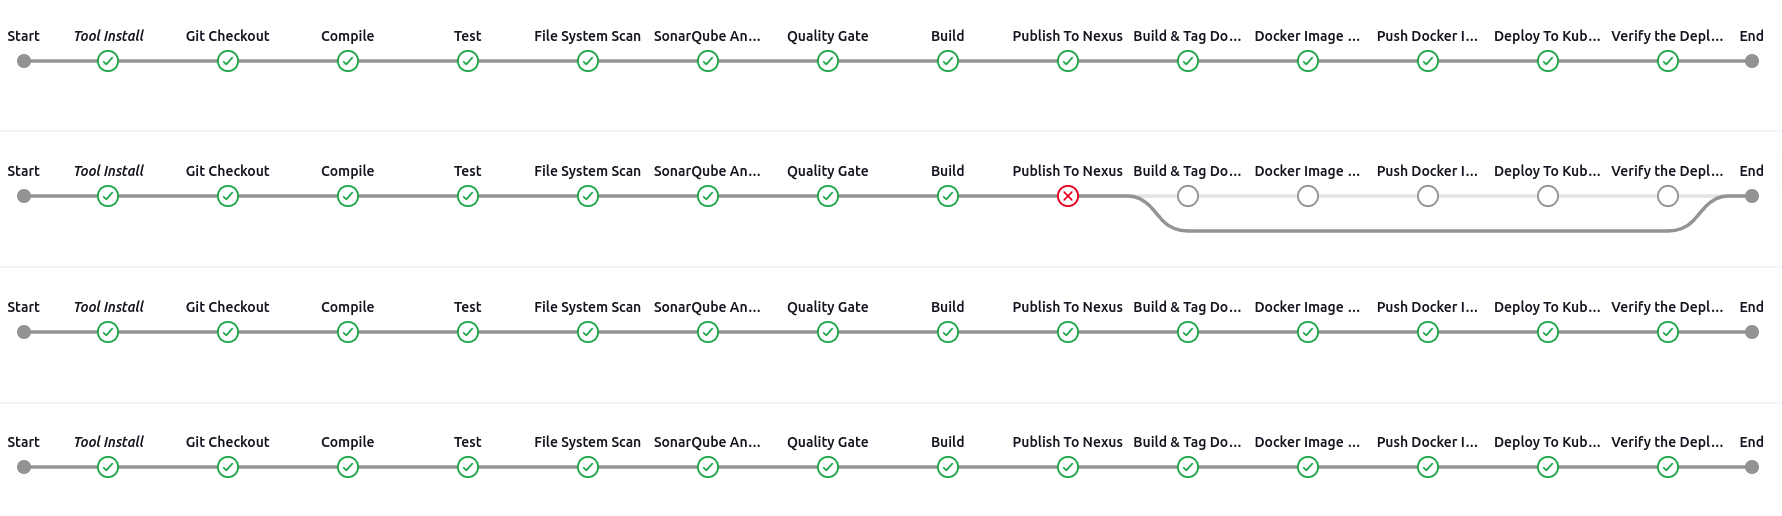
- Create a CICD-Pipeline and Enter the following pipeline script
To create a CI/CD pipeline, follow these steps:
- Navigate to Jenkins.
- Enter the desired project name.
- Select the Pipeline option.
- Click on OK to proceed.
- Paste the following pipeline script:
- Change the docker user name, and git repo link.
| pipeline { agent any tools { jdk ‘jdk17’ maven ‘maven3’ } environment { SCANNER_HOME = tool ‘sonar-scanner’ IMAGE_REPO = ‘DockerRegUserName/boardshack-dev’ BASE_VERSION = ‘1.0.0’ // This should be updated manually for major/minor/patch versions } stages { stage(‘Git Checkout’) { steps { git branch: ‘main’, credentialsId: ‘git-cred’, url: ‘https://github.com/Enamulitc/Java-Boardgame.git’ } } stage(‘Compile’) { steps { sh “mvn compile” } } stage(‘Test’) { steps { sh “mvn test” } } stage(‘File System Scan’) { steps { sh “trivy fs –format table -o trivy-fs-report.html .” } } stage(‘SonarQube Analysis’) { steps { withSonarQubeEnv(‘sonar’) { sh ”’ $SCANNER_HOME/bin/sonar-scanner -Dsonar.projectName=BoardGame -Dsonar.projectKey=BoardGame \ -Dsonar.java.binaries=. ”’ } } } stage(‘Quality Gate’) { steps { script { waitForQualityGate abortPipeline: false, credentialsId: ‘sonar-token’ } } } stage(‘Build’) { steps { sh “mvn package” } } stage(‘Publish To Nexus’) { steps { withMaven(globalMavenSettingsConfig: ‘global-settings’, jdk: ‘jdk17’, maven: ‘maven3’, mavenSettingsConfig: ”, traceability: true) { sh “mvn deploy” } } } stage(‘Build & Tag Docker Image’) { steps { script { def gitCommit = sh(script: ‘git rev-parse –short HEAD’, returnStdout: true).trim() def buildNumber = currentBuild.number def imageTag = “${BASE_VERSION}-${buildNumber}-${gitCommit}” env.IMAGE_TAG = “${IMAGE_REPO}:${imageTag}” withDockerRegistry(credentialsId: ‘docker-cred’, toolName: ‘docker’) { sh “docker build -t ${IMAGE_TAG} .” } } } } stage(‘Docker Image Scan’) { steps { sh “trivy image –format table -o trivy-image-report.html ${IMAGE_TAG} “ } } stage(‘Push Docker Image’) { steps { script { withDockerRegistry(credentialsId: ‘docker-cred’, toolName: ‘docker’) { sh “docker push ${IMAGE_TAG}” } } } } stage(‘Deploy To Kubernetes’) { steps { withKubeConfig(caCertificate: ”, clusterName: ‘kubernetes’, contextName: ”, credentialsId: ‘k8-cred’, namespace: ‘webapps’, restrictKubeConfigAccess: false, serverUrl: ‘https://18.139.40.51:6443’) { sh “kubectl set image deployment/boardgame-deployment boardgame=${IMAGE_TAG} -n webapps” } } } stage(‘Verify the Deployment’) { steps { withKubeConfig(caCertificate: ”, clusterName: ‘kubernetes’, contextName: ”, credentialsId: ‘k8-cred’, namespace: ‘webapps’, restrictKubeConfigAccess: false, serverUrl: ‘https://Kubernetes-Master-Node-IP:6443’) { sh “kubectl get pods -n webapps” sh “kubectl get svc -n webapps” } } } } } |
Post notification setup we will add very soon.
Step 5: Monitoring Server (Optional)
To set up the monitoring server, follow the provided installation script. Run the script on your monitoring server.
- Prometheus and Grafana Installation and Configuration
Install and configure Prometheus to monitor the performance and health of your applications. To install Prometheus and Grafana use this script
- Node Exporter
Set up Node Exporter to collect hardware and OS metrics from the target server, to install NodeExporter use the script
- Blackbox Exporter for External Monitoring
Install and configure Blackbox Exporter to monitor external services and endpoints, to install and configure Blackbox use this script
- Alert and Notification System
Set up an alerting and notification system to receive alerts based on defined thresholds and conditions.
This blog is still being enhanced, but most of the installation and configuration can already be done using the provided script in the repository. More details will be available soon.
Coming soon:
- Jenkins post-notification on Slack/email
- End-to-end monitoring setup
- Infrastructure provisioning with Terraform
- Detailed Kubernetes cluster setup
- Comprehensive pipeline script preparation
Stay tuned for updates!