Persistent Volumes (PVs) are a critical part of Kubernetes for managing durable storage. This blog explains the concepts of PVs, their types, and how to set up NFS and AWS EBS-backed PVs. We also highlight the necessary access privileges and detailed steps for setting up and connecting various components.
Steps Overview
- Understanding Persistent Volumes (PVs) and Types
- Setting Up NFS as a Persistent Volume
- Create and configure the NFS Server
- Install NFS Client on Kubernetes Nodes
- Deploy NFS Provisioner using Helm
- Create Persistent Volume Claim (PVC) for NFS
- Deploy an application using NFS PVC
- Dynamic AWS EBS Block Storage Provisioning
- Prepare AWS StorageClass
- Create AWS Secrets for IAM User
- Install AWS EBS CSI Driver
- Create PVC for EBS
- Deploy a Pod using EBS PVC
- Access Privileges and Modes
- Access Privileges for NFS and AWS
- Volume Binding Modes
- Access Modes for Persistent Volumes
Understanding Persistent Volumes and Types
Persistent Volumes (PVs)
A PV is a storage resource provisioned in a cluster. It can be created by an administrator (static provisioning) or dynamically using Storage Classes.
Types of Persistent Storage
- Pod-Label Volume: Shared within the same pod but not across multiple pods or nodes. Data is lost if the pod is deleted.
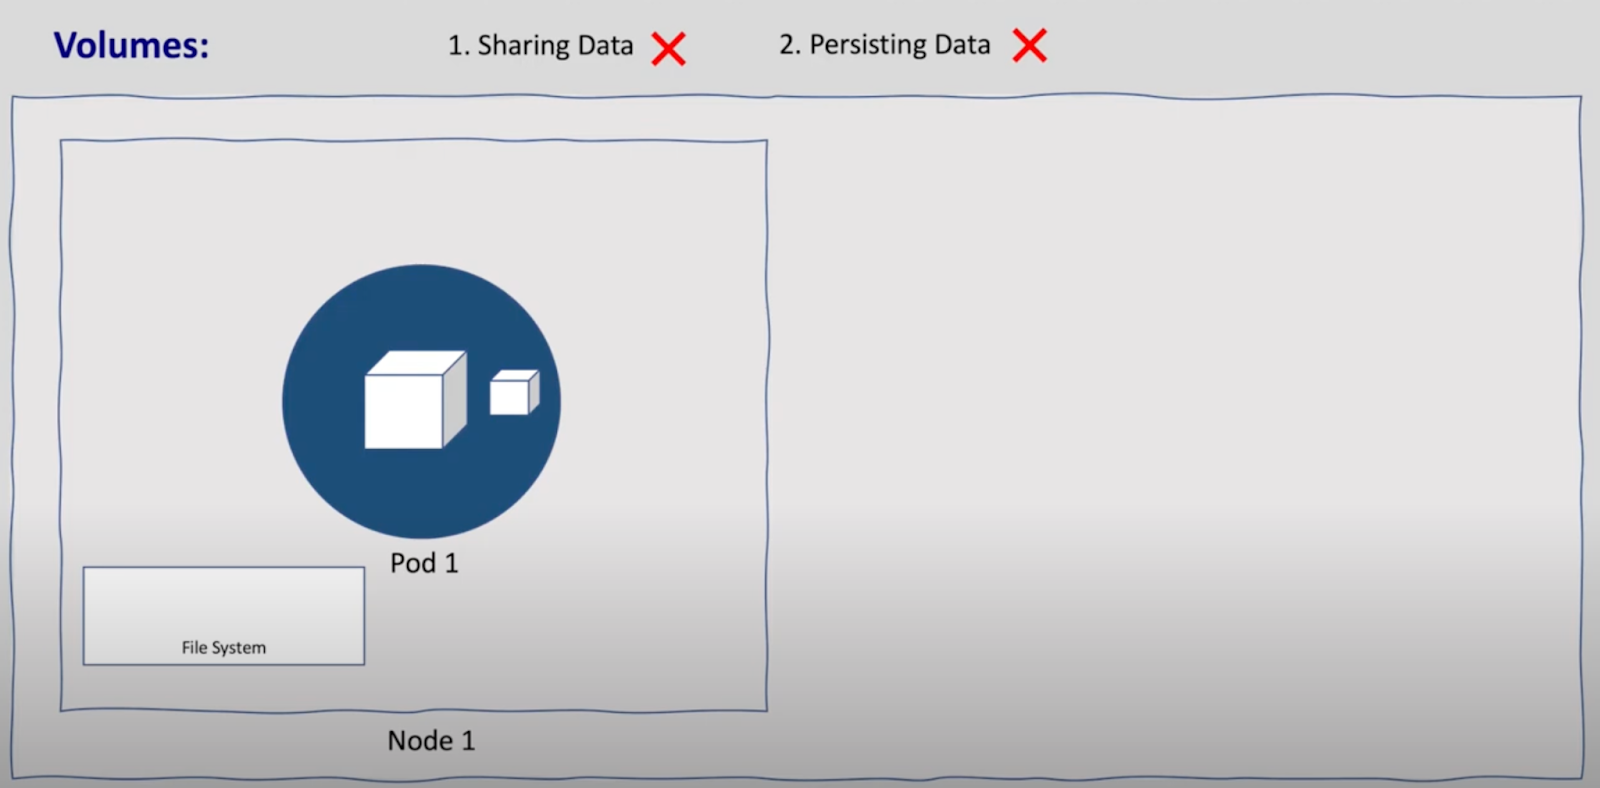
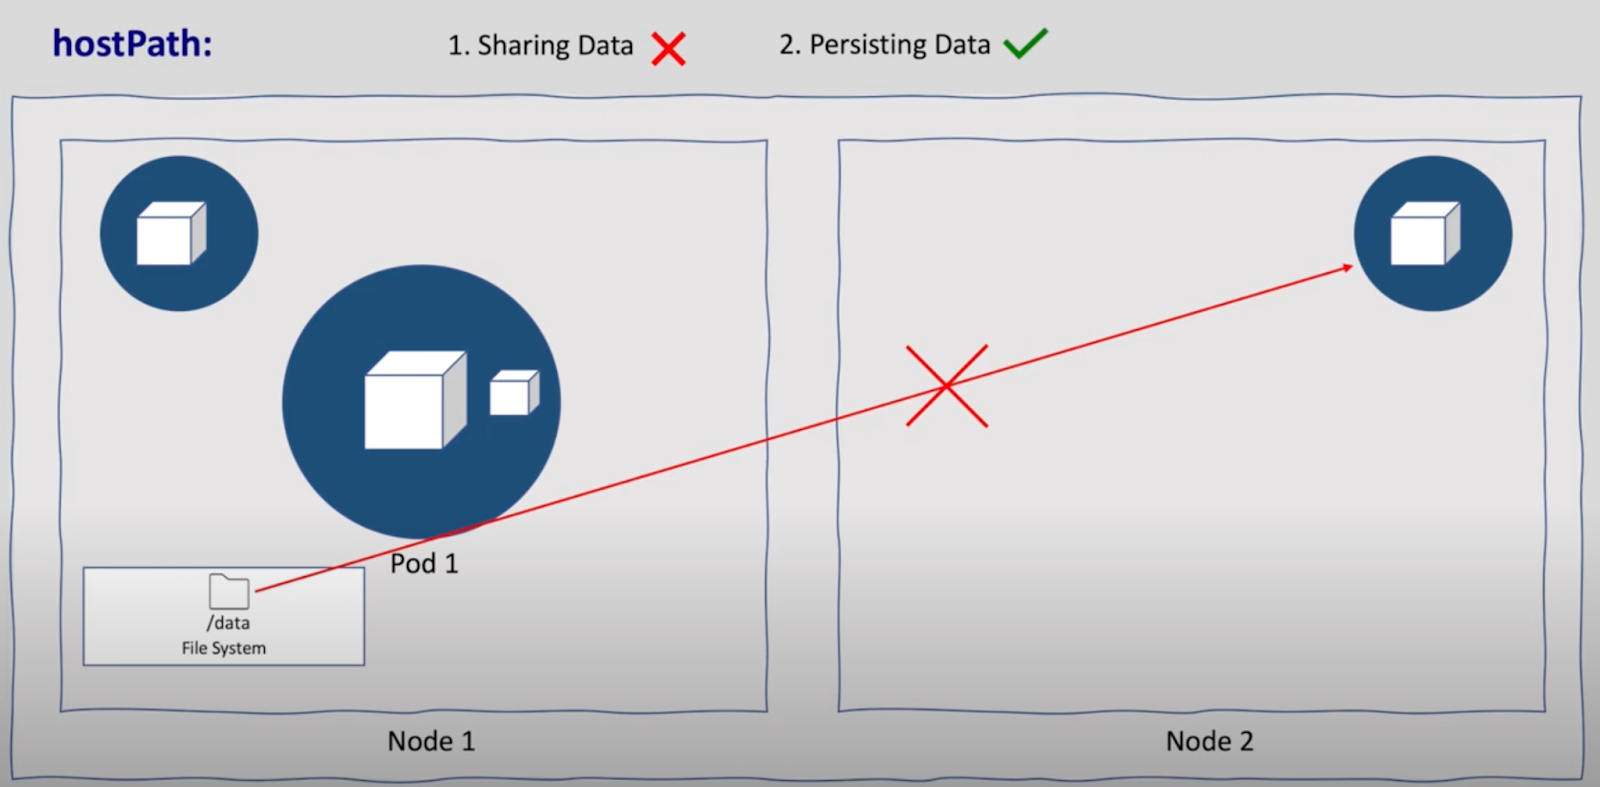
- HostPath-Label Volume: Shared among pods within the same node but not across multiple nodes.
- Node-Label Volume: Can use local or external storage (e.g., NFS, cloud storage). Data remains intact even if the pod, node, or cluster goes down.

Setting Up NFS as a Persistent Volume
Create and Configure the NFS Server
- Update the System Repository:
| sudo apt update |
- Install NFS Server:
| sudo apt install nfs-kernel-server |
- Create Data Directory:
| sudo mkdir –mode=775 /k8sdata |
- Configure NFS Exports:
| sudo vim /etc/exports |
Add the following lines:
| /k8sdata *(rw,sync,no_subtree_check) |
- Initialize the Shared Directory:
| sudo exportfs -a sudo exportfs -r |
- Restart NFS Server:
| sudo systemctl restart nfs-kernel-server sudo systemctl status nfs-kernel-server |
Install NFS Client on Kubernetes Nodes
- Install NFS Client:
| sudo apt install nfs-common -y |
- Verify the Shared Directory:
| showmount -e [NFS-Server] |
Deploy NFS Provisioner Using Helm
Visit the repo to get all manifest https://github.com/Enamulitc/k8s-Lab/tree/main/k8s-pv
- Install Helm:
| curl https://baltocdn.com/helm/signing.asc | sudo apt-key add – sudo apt-get install apt-transport-https –yes echo “deb https://baltocdn.com/helm/stable/debian/ all main” | sudo tee /etc/apt/sources.list.d/helm-stable-debian.list sudo apt-get update sudo apt-get install helm |
- Add NFS Provisioner Repo:
| helm repo add nfs-subdir-external-provisioner https://kubernetes-sigs.github.io/nfs-subdir-external-provisioner/ |
| helm repo update |
- Create Namespace for NFS:
| kubectl create ns storagenfs |
- Deploy NFS Provisioner:
| helm install nfs-subdir-external-provisioner \ nfs-subdir-external-provisioner/nfs-subdir-external-provisioner \ –set nfs.server=[NFS-Server-IP] \ –set nfs.path=/k8sdata \ –set storageClass.onDelete=true -n storagenfs |
- Verify Deployment:
| kubectl get pods -n storagenfs kubectl get storageclass |
Create Persistent Volume Claim (PVC) for NFS
- Create PVC Manifest:
| # 1-sample-nfs-pvc.yaml apiVersion: v1 kind: PersistentVolumeClaim metadata: name: sample-nfs-pvc spec: accessModes: – ReadWriteOnce storageClassName: nfs-client resources: requests: storage: 2Gi |
- Deploy PVC:
| kubectl apply -f 1-sample-nfs-pvc.yaml |
Deploy an Application Using NFS PVC
- Create Service Manifest:
| # 2-nfs-nginx-svc.yaml apiVersion: v1 kind: Service metadata: name: nfs-nginx-svc spec: selector: app: sc-nginx ports: – protocol: TCP port: 80 targetPort: 80 |
- Create Deployment Manifest:
| # nfs-nginx-deployment.yaml apiVersion: apps/v1 kind: Deployment metadata: name: nfs-nginx spec: replicas: 2 selector: matchLabels: app: sc-nginx template: metadata: labels: app: sc-nginx spec: volumes: – name: nfs-test persistentVolumeClaim: claimName: sample-nfs-pvc containers: – image: nginx name: nginx volumeMounts: – name: nfs-test mountPath: /usr/share/nginx/html ports: – containerPort: 80 |
- Deploy the Application:
| kubectl apply -f 2-nfs-nginx-svc.yaml |
| kubectl apply -f nfs-nginx-deployment.yaml |
Dynamic AWS EBS Block Storage Provisioning
Visit the repo to get all manifest https://github.com/Enamulitc/k8s-Lab/tree/main/k8s-pv/aws-ebs
Prepare AWS StorageClass
- Create StorageClass Manifest:
| # 1-storage-class.yaml apiVersion: storage.k8s.io/v1 kind: StorageClass metadata: name: ebs-sc provisioner: ebs.csi.aws.com parameters: type: gp2 volumeBindingMode: WaitForFirstConsumer |
- Deploy StorageClass:
| kubectl apply -f 1-storage-class.yaml |
Create AWS Secrets for IAM User
- Create Secret for AWS Credentials:
| kubectl create secret generic aws-secret \ –namespace kube-system \ –from-literal “key_id=AWS_ACCESS_KEY_ID” \ –from-literal “access_key=AWS_SECRET_ACCESS_KEY” |
Install AWS EBS CSI Driver
- Add Helm Repo for EBS CSI Driver:
| helm repo add aws-ebs-csi-driver https://kubernetes-sigs.github.io/aws-ebs-csi-driver helm repo update |
- Install EBS CSI Driver:
| helm upgrade –install aws-ebs-csi-driver \ –namespace kube-system \ aws-ebs-csi-driver/aws-ebs-csi-driver |
- Verify Installation:
| kubectl get pods -n kube-system -l app.kubernetes.io/name=aws-ebs-csi-driver |
Create PVC for EBS
- Create PVC Manifest:
| # 2-sample-ebs-pvc.yaml apiVersion: v1 kind: PersistentVolumeClaim metadata: name: ebs-claim spec: accessModes: – ReadWriteOnce storageClassName: ebs-sc resources: requests: storage: 1Gi |
- Deploy PVC:
| kubectl apply -f 2-sample-ebs-pvc.yaml |
Deploy a Pod Using EBS PVC
- Create Pod Manifest:
| # 3-sample-ebs-pv-pod.yaml apiVersion: v1 kind: Pod metadata: name: app spec: containers: – name: app image: centos command: [“/bin/sh”] args: [“-c”, “while true; do echo $(date -u) >> /data/out.txt; sleep 5; done”] volumeMounts: – name: persistent-storage mountPath: /data volumes: – name: persistent-storage persistentVolumeClaim: claimName: ebs-claim |
- Deploy the Pod:
| kubectl apply -f 3-sample-ebs-pv-pod.yaml |
Verification
- Verify StorageClass:
| kubectl get storageclass |
- Verify PVC:
| kubectl get pvc |
- Verify PV:
| kubectl get pv |
Access Privileges and Modes
Access Privileges
NFS
- NFS Server: Requires root privileges to set up and configure.
- NFS Client: Requires root privileges to install NFS client packages.
AWS
- IAM User: Needs specific IAM policies to create and manage EBS volumes.
- AWS_ACCESS_KEY_ID and AWS_SECRET_ACCESS_KEY are required for creating Kubernetes secrets.
Volume Binding Modes
- WaitForFirstConsumer: Volume is provisioned only when a pod using the PVC is scheduled. This helps in ensuring the volume is created in the same zone as the pod.
- Immediate: Volume is provisioned as soon as the PVC is created, regardless of whether a pod is scheduled.
Access Modes
- ReadWriteOnce (RWO): The volume can be mounted as read-write by a single node.
- ReadOnlyMany (ROX): The volume can be mounted as read-only by many nodes.
- ReadWriteMany (RWX): The volume can be mounted as read-write by many nodes.
Choosing the appropriate access mode and volume binding mode depends on the use case and the application’s requirements.
Conclusion
Understanding and implementing persistent volumes in Kubernetes is crucial for managing storage efficiently. This guide provides detailed steps to set up NFS and AWS EBS-backed PVs, ensuring data persistence across pod restarts and node failures. With the knowledge of access privileges, volume binding modes, and access modes, you can tailor your Kubernetes storage solution to meet your application’s needs.