PostgreSQL Streaming Replication is a powerful feature that enables real-time data synchronization between primary and secondary databases. This step-by-step guide will walk you through the process of configuring streaming replication on Ubuntu, allowing you to achieve high availability and data redundancy in your PostgreSQL environment.
- 1. Introduction to Streaming Replication
- Overview
- Importance in PostgreSQL
- Use Cases
- 2. How WAL is Shipped and Applied
- Write-Ahead Logging (WAL)
- Process of Shipping and Applying WAL
- 3. Characteristics of Synchronous and Asynchronous Replications
- Synchronous Replication
- Asynchronous Replication
- Performance Considerations
- 4. Prerequisites
- Required Server Setup
- User and Database Configuration
- 5. Configuration Steps
- Step 1: Configure Master
- Step 2: Initialize Slave
- Step 3: Verify Master
- Step 4: Verify Slave
- Step 5: Check Replication Type
- Step 6: Verify on Slave
- Step 7: Enable Synchronous Replication (Optional)
- 6. Failover and Recovery
- Promoting Standby to Primary
- Adding Old Primary as Standby
- Monitoring Replication
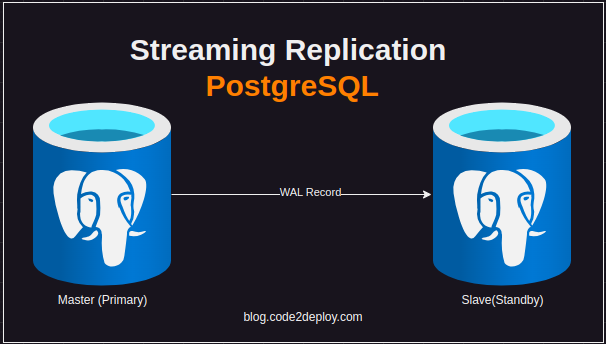
Introduction to Streaming Replication
PostgreSQL Streaming Replication facilitates continuous data transfer from one PostgreSQL database (the primary) to one or more secondary databases (standbys). This enables near-real-time synchronization of data changes, making it ideal for applications requiring low latency and high availability, such as online transaction processing systems.
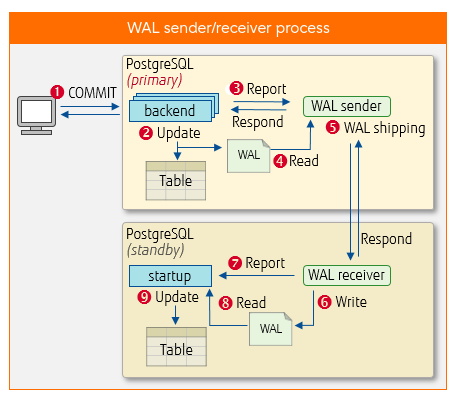
How the WAL is shipped and applied:
Write-Ahead Logging (WAL) records all changes made to the database before applying them to the data files. In streaming replication, these WAL records are shipped from the primary to the standby servers and applied to maintain consistency across the databases.
Characteristics of synchronous and asynchronous replications:
- Synchronous Replication: Ensures that every transaction is committed on both the primary and standby servers before acknowledging the commit to the client. This guarantees consistency but may impact performance due to the added latency.
- Asynchronous Replication: Allows the primary server to acknowledge commits to the client before ensuring they are applied on the standby server. While providing better performance, it may result in potential data loss if the primary server fails before changes are replicated to the standby.
Prerequisites
- One Master Database Server (Primary Server)
- One Slave Database Server (Standby Server)
- Database Created on both servers
- Database user for Application
- Replicator User for Master Node
- Both servers are accessible remotely to each other
Primary/Master-DB:
- Host: 172.16.1.10
- DB-Name: rnd_db
- User: rnd_dbuser
- Pass: [hidden]
- Master-Replication-User: replicator
- Pass: [hidden]
Secondary/Slave-DB:
- Host: 172.16.1.11
- DB-Name: rnd_db
- User: rnd_dbuser
- Pass: [hidden]
Configuration Steps
Step 1: Configure Master
Edit postgresql.conf and pg_hba.conf to allow replication and authenticate the standby server:
| ##Allow the all host vim /etc/postgresql/14/main/postgresql.conf listen_addresses = ‘*’ |
Edit pg_hba.conf
| ## authenticate the specific host vim /etc/postgresql/14/main/pg_hba.conf #add the below line host replication replicator 172.16.1.11/24 md5 |
Create Replication User:
| CREATE USER replicator WITH REPLICATION ENCRYPTED PASSWORD ‘Password’; |
Then restart the Postgres server
| systemctl restart postgresql |
Step 2: Initialize Slave
Stop PostgreSQL, backup the data directory, and initialize replication:
| systemctl stop postgresql |
#Then login to the Postgres server
| su – postgres |
Take a backup of the following directory
| cp -r /var/lib/postgresql/14/main/ /var/lib/postgresql/14/main_old/ |
Remove the main directory from the specific dir
| rm -rf /var/lib/postgresql/14/main |
Run the bashbackup
| pg_basebackup -h 172.16.1.10 -D /var/lib/postgresql/14/main/ -U replicator -P -v -R -X stream -C -S slaveslot1 |
Step 3: Verify Master
| su – postgres psql SELECT * FROM pg_replication_slots; |
Step 4: Verify Slave
Run the Postgres server
| systemctl start postgresql |
Check replication status
| select * from pg_stat_wal_receiver; |
Step 5: Check the Replication Type on the Master Node
Now, verify the replication type synchronous or asynchronous using the below command on the master database server.
| SELECT * FROM pg_stat_replication; |
Create a database on the master server and verify if it replicates to the slave
| create database stream; |
Step 6: Verify on Slave
Check if the newly created database has been replicated to the slave
| select datname from pg_database; |
Step 7: Enable Synchronous Replication (Optional)
If you want to enable synchronous replication, run the following command on the master server and reload PostgreSQL service.
| ALTER SYSTEM SET synchronous_standby_names TO ‘*’; |
Reload the database service
| systemctl reload postgresql |
Failover and Recovery:
If your primary PostgreSQL server is down and you need to promote the secondary standby server to become the new primary server, you can follow these general steps:
- Verify the Status: Ensure that the primary server is indeed down and not just experiencing temporary issues. Check logs and monitor server status if possible.
- Promoting Standby to Primary:
- Log in to the standby server where replication is set up.
- Modify the PostgreSQL configuration file (postgresql.conf) to allow this server to be promoted to the primary role. You typically need to change the value of hot_standby to on.
| hot_standby = on |
- Restart the PostgreSQL service after making the changes.
- Set PGDATA Environment Variable (Optional): If necessary, set the PGDATA environment variable to point to the PostgreSQL data directory of the standby server.
| export PGDATA=/var/lib/postgresql/14/main |
- Promote Standby Server: Run the pg_ctl promote command to promote the standby server to the primary role.
| /usr/lib/postgresql/14/bin/pg_ctl promote |
- Verify Promotion: Confirm the successful promotion of the standby server to the primary role by checking the status using SQL query:
| SELECT pg_is_in_recovery(); |
Adding Old Primary as Standby:
- Ensure Old Primary Is Up: Once the original primary server is back up and running, proceed to add it as a standby to the current primary server.
- Configure Recovery.conf (or Postgresql.auto.conf): Update the recovery.conf (or postgresql.auto.conf in newer versions) file on the old primary server to set it up as a standby. Include parameters such as standby_mode, primary_conninfo, and trigger_file.
- Start PostgreSQL: Start the PostgreSQL service on the old primary server. PostgreSQL will then begin streaming replication from the current primary server.
- Monitor Replication: Monitor the replication status between the new primary server and the old primary server (now standby) to ensure data is being replicated correctly. You can use tools like pg_stat_replication or check the logs for any errors.
By following these steps, you’ve successfully promoted the standby database to become the new primary database and added the old primary database as a standby. This ensures high availability and fault tolerance in your PostgreSQL database environment. If you encounter any issues or have further questions, feel free to ask!


Thank you for the auspicious writeup. It if truth be told was a entertainment account it. Glance complex to far delivered agreeable from you! By the way, how can we be in contact?
Thanks for the valuable feedback. connect.code2deploy@gmail.com